This article describes the Budget Settings—these settings affect the budget as a whole. The Worksheet Settings article describes the settings that only affect a particular worksheet.
On the lower section of the left navigation menu, select the gear icon or “Budget Settings” to display the settings page.
There are five subsections for settings. Each section can be expanded or collapsed by selecting the section name and description. Once expanded, you will see a Close link in the lower left. Also a Previous Section and/or Next Section link will display in the lower right.
The following image shows the Budget Settings with all sections collapsed.

The sections are:
Budget Title & Periods
The Budget Title defaults to “New Budget” when you create a budget. You can then edit the title, entering up to a maximum of 300 characters. A Budget Title is required. Below the Budget Title you will see a hint that shows the number of characters used, for example, 10/300, as shown in the following image.

Based on the width of your computer screen, the full Budget Title may not show in the header, but instead display with an ellipsis (…); you can see the full title by hovering over it, as shown in the following image.

Periods
This section establishes the start and end dates for each budget period. You need to have at least a Budget Start Date before adding any costs.
There are two period options: Equal Length Periods and Varied Length Periods. By default, the Equal Length option initially displays. To select the Varied Length option, select it from its tab.
Note: when you create a new budget, it will open to this section so that you can add your Budget Start Date.
Equal Length Periods
The following image shows equal length periods:

Use this choice to easily set up a number of periods of the same length. Add a date in the Budget Start Date field. By default, the Total Number of Periods value is set to one (1), and the Length of Each Period (Months) is set to 12.
Once you add a start date, a list of periods will appear below the period length field. It displays the period description and its start and end dates. As you change any of the variables, the list will automatically update to reflect your changes.
To change the Total Number of Periods, use its drop-down menu. It contains the values one through ten, and a Custom option. For example, if you select five periods, the system will generate the start and end dates for all of the periods, based on the Budget Start Date you entered and the period length.
Use the Length of Each Period (Months) field to change the value from the default of 12. Once you click out of the field, the system will update the period dates to adjust for the new period length. The period length is in months and therefore must be an integer number.
Note: The date ranges for periods must be contiguous; no gaps in time between periods are allowed. The system will enforce this.
The default Descriptions for the periods are Period 1, Period 2, and so forth. You can edit a description, entering up to 100 characters. A value is required for every period description.
Varied Length
Choose this option if you know your budget has periods of unequal length.
The following image shows this option.

The first editable field is the Description. The default Descriptions are Period 1, Period 2, and so forth. You can edit a description, entering up to 100 characters. A value is required for every period description.
Enter a Start Date for the first period. By default, the system will add an End Date to make the period 12 months in length. Edit the End Date as needed. The system will recalculate the length in months.
Use the Add Period link below the Period Description field to generate another period with the same length as the prior one.
As needed, adjust the End Dates of existing periods, and use the Add Period link to define all of your budget’s periods.
For periods other than the first one, you can only change the end date values. The system will ensure that each End Date is greater than its period Start Date. As you change end dates, the system will adjust the dates for any future periods already created.
Switching Between Period Options
If you have set a start date and added periods using either the equal or varied length option, and then switch to the other option, the system will use the start date, the number of periods, and the length of the first period to calculate new end dates as needed.
Deleting Periods
You have the option to delete either the first or last period from a budget. When you delete the first period, the new budget start date will be that of the original period 2. If you delete the last period, then the final budget end date will be that of the now last period.
Note: When you delete periods, the remaining period descriptions are not changed.
Spending Targets
This section allows you to set a spending target for each period and select the value you want to target.
Click on the toggle switch to Enable Targets and Limits. You will then see additional fields for setting up your targets.
You have two options for setting your target amounts: Equal Spending Targets and Varied Spending Targets. With equal targets, the same amount is applied to every period. With varied targets, you can apply different amounts to individual periods.
The following image shows the default Equal Spending Targets option:

Select the varied tab to change options.
- For Equal Spending Targets, enter your dollar amount in the Spending Target Amount (Per Period) field.
- For Varied Spending Targets, enter a dollar amount in the field for each period.
The following image shows an example of Varied Spending Targets.

Next select which budget total you want to target. The choices are:
- Total Direct Costs
- Total Direct Costs less Subrecipient F&A
- Total Project Costs
The corresponding total in the Budget Header will display an arrow following its value. The arrow will be black and pointing down if your total is below the target. The arrow will be red and pointing up if your total exceeds the target. You can select the value in the header to see period details, and optionally, edit the spending target values.
The following image shows the period details.

Salary Cap
This section allows you to set a maximum annual salary cap when your sponsor requires one. By default, this option is not selected.
Click on the toggle switch to Enable Salary Cap. You will then see additional fields.
For the Salary Cap Amount field, enter the value your sponsor requires. By default, the initial value is zero.
The Salary Cap Note is optional. If you enter a note, you will see it on some exports of your budget.
The following image shows this section.

On your budget worksheets, you will see a “cap” indicator following the name of any personnel whose salary is capped. When you hover over the indicator, you will see the text “This salary is calculated using the annual salary cap of $###,###.”
When you select the person’s dollar amount for any period, you will see the details in the side panel. Both their total pre-capped salary and the total capped salary display. The total capped salary for a period is the cap amount times the person’s percent effort.
The current NIH salary cap can be found here.
Data & Calculations
This section allows you to set choices for benefit rates, salaries, rounding, cascading, and inflation rates. The following image shows the benefit, salary, and rounding areas in this section.

Benefit Rates
You have a choice of using preliminary benefit rates for the next fiscal year when they are available, or of always using only the current rates. By default, the Preliminary option is selected. Note that some sponsors will only accept current, published benefit rates.
Preliminary benefit rates are the anticipated values for the coming fiscal year. They are generally available in SAGE Budget in late spring for future budgeting. The system uses preliminary benefit rates in a budget period only if that period starts on or after July 1. That is, the period’s start date must be in the same fiscal year as that of the preliminary benefit rates, or in a future fiscal year.
Note: Benefit rates used for any individual are editable.
Refresh Benefit Rates and Refresh Salary
You have the option to refresh the benefit rate and/or salary amount for all UW Personnel on your worksheets, other than subawards.
Doing a refresh will replace the benefit rate and/or salary amount, including any customized values, with current values from Workday.
When you select refresh, you will see a confirmation dialog. You can cancel or continue with the refresh.
Round Currency Expenses
There are three options for rounding currency (dollar) amounts for display: To Whole Dollar, To Cents, and Do Not Round. By default, the To Whole Dollar option is selected.
If you select either To Whole Dollar or To Cents, the period amount for each cost is rounded as are the totals for each period and the All Periods amounts. The Price amount for entries in the Other Cost section is never rounded.
For the To Whole Dollar choice, no decimal places display. For the To Cents choice, two decimal places display.
When you select Do Not Round, the Decimal Display for Dollar Amounts field appears. Edit the number of decimal places you want to see displayed. Note that if the previous selection was To Whole Dollar, the default value will be zero (0); if To Cents, the default value will be two (2).
Cascade Other Cost Entries
The following image shows the Cascade Other Cost Entries and the Inflation Rate areas in this section.

Click on the toggle switch to enable the Cascade Other Cost Entries option for the entire budget. You can override this setting for any specific worksheet or individual cost. By default, this option is not selected.
Inflation Rates
There are three inflation rates used in your budget: Salary, Tuition, and General. The default values are 2% for Salary, 3% for Tuition, and 0% for all other costs. You can edit these rates for the whole budget, a specific worksheet, or an individual cost.
Access & Roles
The Access & Roles section allows you to manage who has access to your budget, and what level of access. The following image shows this section with some example data:

The first three rows of the access table are for the Award Preparer, Budget Preparer, and Pre-Award Budget Contact. The Budget Preparer is auto-populated with the name of the person who created the budget. Providing the Pre-Award Budget Contact and Administrative Contact is optional, but it is strongly encouraged you do so.
To add a contact, start typing in the Contact column of the table to search by name or NetID. When you select a person, their organization, email and phone information will display.
To provide others access to your budget, use the Add General Collaborator link, above the table. Selecting the link will add a General Collaborator row to the table. Start typing in the first column to search for the person by name or NetID. Then use the drop-down menu in the Permissions column to give them View Only or Can Edit access. You can change the access permission at any time.
To change or remove contacts or collaborators, select the “more options” menu icon to the far right (three vertical blue dots).
- The Admin and Budget Contacts can be demoted to a General Collaborator with edit permission or removed from the budget entirely.
- General Collaborators can be promoted to be the Preparer or a Contact, or removed from the budget entirely.
- If the contact role is empty, the collaborator is automatically promoted to the contact role.
- If the contact role is not empty, or the change is to the Preparer, a confirmation dialog appears to confirm the replacement. The person being replaced is demoted to a General Collaborator with edit permission.
- If you try to add an already-listed person directly, their name will appear grayed out in the search results.
The following images show the “more options” menus for both contacts and collaborators.


Permissions on a Copied Budget
If the person who is making the copy is not the Budget Preparer on the original budget, then they will become the Budget Preparer (owner) on the new budget, and the original preparer will become a General Collaborator with Can Edit access.
Permissions on Budgets Connected to eGC1s, Advance Budget Requests, and Award Setup Requests
When your budget is connected to an eGC1, you will also see the eGC1 Preparer and the eGC1’s PI listed as owners. If the eGC1 has a related Advance Budget Request or Award Setup Request, you will also see the Advance Preparer(s) or Award Preparer and others with access to the Advance or Award. See the article about Connected SAGE Budgets and eGC1s for full details.
Budget List
When you log in to SAGE Budget, you will see your budget list. From there you can do the following:
If your budget list has no items, a piggy bank image displays with the text “Start your first budget! SAGE Budget helps you glide through the process of preparing accurate budgets that comply with complicated sponsor guidelines.” Use the New Budget button below the piggy bank image to create a budget.
Create a New Budget
To create a budget, select the New Budget button on the upper left. The following image shows the button:

Your new budget will open and display the Budget Settings section for adding periods. Once you add a Budget Start Date, you can begin entering costs or move to any other part of the budget.
View Your List of Existing Budgets
Your budget list includes any budget that you have permission to edit or to view. The following information is displayed for each budget on your list:
- Title – the title of your budget; click on the title to open your budget in the same tab or right-click to open in a new tab
- Principal Investigator – the first and last name of the person designated as the PI on the budget’s primary worksheet
- Budget Number – the unique, system-generated number for your budget
- Active Linked Application – the most recently linked application for this budget, if there is one; click the link to open the application in a new tab
- Last Edited – the date this budget was last edited, and the person who did the editing
- Created Date – the date this budget was created
The budgets are in order by the Last Edited date, with the most recently edited one at the top. The following image shows an example budget list.

By default, there are 10 budgets listed on the page. The pagination tool at the bottom right of the list allows you to set the number of budgets shown on the page to 10, 25, or 50. When you change the number per page, the list will re-display from the top.
When you have more budgets than can display on a page, you can click on the arrows to move up or down the list. As you move through the list you will see an indication of where you are. For example, 26-50 of 221 indicates 25 budgets display on a page, and that you are on the second page of a list with a total of 221 budgets. The following image display this example.

Search for an Existing Budget
To quickly find a budget, you can use the type-ahead search feature at the top, right of the page.
Click in the box and enter a search term. You can search by budget title, number, or the Principal Investigator’s name. When you pause in typing, a results list will appear. Click on an item in the list to open that budget. Changing the text in the search box will start a new search.
The following image shows a search term and results list.

Note: Upgraded Legacy Budgets
On January 28, 2022, budgets in the legacy format were upgraded to the current format. Review the Automatically Upgraded Legacy Budgets article for complete details.
Copy an Existing Budget
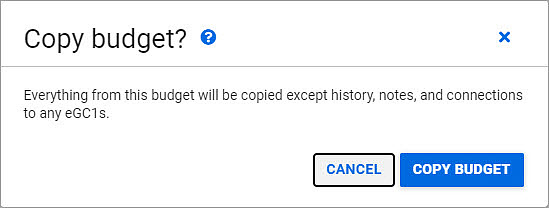
You can copy an existing budget to create a new one. At the far right of the budget header, select the “more options” menu icon (three blue vertical dots). Choose the Copy Budget option from the menu. A confirmation dialog will appear, stating that “Everything from this budget will be copied except history, notes, and connections to any eGC1s.” The following image shows this dialog.

When you confirm Copy Budget, your new budget will be created and you will see it in a new tab/window. The budget you copied will continue to display in its own tab/window.
You can copy any budget that you have edit or view-only access to.
Delete an Existing Budget
Note: deleting a budget is permanent.
You can delete a budget that you can edit, unless it is connected to an eGC1 or to an Award Setup Request.
At the far right of the budget header, select the “more options” menu icon, three blue vertical dots. Choose the Delete Budget option from the menu. A confirmation dialog will appear, stating “This entire budget will be permanently deleted.” The following image shows this dialog.

When you confirm the deletion, your budget list will display, and the deleted budget will no longer appear on the list.
SAGE Infrastructure Updates
Switch to new Clinical Salary Service End Point
UW IT has made a change to their Clinical Salary service, which requires SAGE to update to their new end point.
Switch to new Space Service End Point
UW IT has made a change to their Space Web service, which requires SAGE to update to their new end point.
FIX: Update procedure causing task list performance issues
One of the procedures supporting the subaward task list has been improved in its design in order to improve performance when searching.
Upgrade front end developer tools
The front end engineers have upgraded to a new set of tools and a consolidation of code into a monorepo architecture. This update provides important streamlining benefits, allowing SAGE to deploy updates in a targeted way, and for code to become more easily managed and maintained.
SAGE Budget
FIX: SAGE Budget salary refresh causing display issues
An issue was resolved in the viewing of salary details in SAGE Budget, occurring at times when salary data was refreshed by the user.
FIX: SAGE Budget re-saving issue in salary details view
An issue was resolved in the viewing of salary details in SAGE Budget, where re-saving of the select allocation details caused clinical salary to be omitted.
Connected Budget and eGC1
When you link a SAGE Budget to an eGC1, each item’s contacts and access lists are combined into a shared “access” page. A set of rules determines how the data is combined, so that no user loses access.
Once you link the Budget and the eGC1, you can make changes from either the eGC1’s Contact & Access page or from the Budget Settings Access & Roles section.
The shared page includes the “owners” which are the Administrative Contact, Pre-Award Budget Contact, eGC1 Preparer, Budget Preparer and the eGC1’s PI. The list will also include any general collaborators with assigned access, either Can Edit or View Only.
The rules for combining the information from the original pages are:
- If you have different Administrative Contacts and Budget Contacts listed on your eGC1 and your SAGE budget when they are connected:
- Any existing SAGE Budget contacts will display on the resulting shared page.
- The eGC1’s contacts will change to editable access, either Read/Write (eGC1) or Can Edit (Budget). Note: If your budget does not have an Administrative or Budget Contact, then the eGC1 contact will display on the shared page.
- The eGC1 and Budget Preparers will display on the shared page.
- The PI listed on the eGC1’s PI & Personnel page will be the PI on the shared access page.
- Users will keep their higher level of access to the connected eGC1 and SAGE Budget. For example, a user with View Only access to the SAGE Budget and Read/Write access to the eGC1, will have edit access on the shared page.
- Read/Write (eGC1) or Can Edit (Budget) are a higher level of access than Read-Only (eGC1) or Can View (Budget).
- Owners (contacts, preparers, and PI) always have edit access.
- Anyone with edit access may change or remove assigned access for anyone else.
Disconnected Budget and eGC1
When you disconnect a budget from an eGC1, each item will retain the Administrative Contact, the Pre-Award Budget Contact and a copy of all users with assigned access.
Additionally, these adjustments will be made:
- The Budget Preparer role will not display on the eGC1. However, if the Budget Preparer had no other access to the eGC1, they will be assigned Read Write access to it.
- The eGC1 Preparer role will not display on the Budget. However, if the eGC1 Preparer had no other access to the Budget, they will be assigned Can Edit access to it.
- The eGC1’s PI will be assigned Can Edit access to the Budget.
Access page for multiple eGC1s and their connected budget
If you have a budget which is connected to multiple eGC1s:
- Access lists for the eGC1s and their connected budget will merge.
- The creator of the most recent eGC1 will become the eGC1 Preparer on the shared access page and will therefore have owner (edit) access.
- Creators of all other eGC1s will have read-only access.
- The PI on the most recent eGC1 will receive any email notifications and be listed as an owner.
- Any former PIs will still display on the PI, Personnel, & Organizations page of the corresponding older eGC1. They will have read-only access to the current eGC1 and Budget. The former PIs will not receive email notifications.
- Note: The PI on the most recent eGC1 will display on your My eGC1s page, so you will be unable to search for an older eGC1 using the former PI’s name.
Access for Global Editors
SAGE users with the Global Edit ASTRA role do not display on the access list for an eGC1 or Budget. They only have access to eGC1s not in Composing status. They will also have read/write access to any budgets connected to those eGC1s.
Notes, tips, and warnings
- If you are preparing your eGC1 and budget at the same time, connect your budget before filling out the access page. You will then only need to fill in the information once.
- If you remove yourself as an owner from the Contacts & Assign Access page for an eGC1 in Composing status or in Withdrawn status with no approvals, you will no longer have any access to the eGC1 or its connected budget. For an eGC1 in Approved or Returned status, you will retain read-only access.
- Be sure you are connecting the correct budget to your eGC1 or the wrong people will end up on the access list.
As you manage an awarded project over time, you might link more than one eGC1 to the same SAGE Budget. When that occurs, there are several things to consider.
Editing Linked eGC1s and their Budget
Generally, you cannot edit an eGC1 in Routing or In OSP status or its linked budget. When you link multiple eGC1s to the same budget, none of the eGC1s or the budget are editable if any one eGC1 is Routing or In OSP.
Shared eGC1 Data: Contacts & Assign Access
Information on the Contacts & Assign Access page is shared across all of the eGC1s and the budget that links them. If you make a change on any one of the eGC1s or the budget, it affects all of the other linked items.
For example, assume you have an older Approved or Awarded eGC1 linked to a budget. You then link a new eGC1 to the same budget. If you make changes on the new eGC1’s Contacts & Assign Access page, those changes will happen on the older eGC1 and the budget also. This ensures that the current contacts receive any system email notifications sent concerning either related eGC1.
Shared eGC1 Data: Research Personnel
Similarly, if you make a change to the PI, Personnel, & Organizations page on any of the linked eGC1s, it will display on all of the other linked eGC1s. You can change the PI, add or delete other personnel, or update an investigator’s status. Once an eGC1 has reached Approved status, the Post-Approval Personnel Changes section displays at the bottom of the page and lists any changes.
The intent is to maintain one up-to-date list of the research personnel working on the project, for the purposes of significant financial interest (SFI) disclosures. When you add new investigators to the list, they will have to create a disclosure for the older eGC1 in addition to the new one.
Note: changes to the PI, Personnel, & Organizations page do not affect the personnel listed on the linked budget.
Any personnel changes you make to an eGC1 after approval do not affect the approval graph. It remains as it was at time of approval. The list of people on the cost share page will be the people who were on the eGC1 at time of OSP approval. Personnel that you add post-approval do not display on this page.
Also, the eGC1 Snapshot on the approval History & Comments page will still show the data as it was at the time that person approved.
Legacy SAGE Budget Retirement
Thanks to valuable user feedback, the Office of Research Information Services (ORIS) launched a redesigned SAGE Budget tool in 2020 with a more streamlined, efficient, and intuitive look and feel. This new design also lays a foundation for upcoming integrations between SAGE and Workday.
Over the last year, we’ve collected your feedback and have added several features to ensure the current SAGE Budget format meets all of your core needs (e.g. APL and Fixed Fee). We are now ready to retire the legacy format, which allows us to focus our continued enhancements in the new format only. This is especially important as we prepare for the critical role that SAGE Budget will play in communicating award budget information to the financial system when the UW goes live with Workday Finance.
Upgrading of all Legacy Budgets
With the retirement of legacy SAGE Budget, all existing budgets in the legacy format will be upgraded to the new (current) budget format. Upgrading means:
- When you open your budget, it will open in the new (current) version.
- Those who had access to the legacy budget will have the same access on the upgraded version.
- On the History page, snapshots of previous budget versions will now display in the new (current) format.
- All costs and settings (like targets and salary caps) that were enabled on the legacy budget will be enabled on the upgraded budget.
- Note: Auto Adjusting Entries (AAE) will not be available in the new (current) format. AAE will be converted to a standard costs line on the primary worksheet, with a note, “Converted Auto Adjusting Line.” The following budget details will remain the same:
- object/sub-object code
- cost amount
- periods
Budget List Updates
The following changes have been made to the budget list:
- The option to create a legacy budget has been removed
- The Format column has been replaced with a Created Date column
- An “Upgraded” indicator displays when a budget has been upgraded by the system
The default sort order on the budget list remains the same, descending by last edited date. You can still search for your budgets by Principal Investigator (PI) name, budget number, or budget title.

Other Budget Updates (released in advance)
The default Prorated Direct Cost (PDC) rate that displays when you enable APL on a budget worksheet has been updated from 35.2% to 35.0%.
SAGE eGC1
Ad Hoc Approver Improvements
Two changes were made to the list of roles that display when adding an ad hoc approver to an eGC1 approval flow:
- Several out-of-date roles have been removed.
- The list has been alphabetized.
SAGE Subawards (released in advance)
Subaward Expiration Fix
Subawards that reached Expired status were not updating to Active status when a modification was processed which pushed the End Date into the future. That issue has been fixed so that the overall Subaward reflects accurate status information.
Subaward History Now Includes All Subaward Status Changes
The Subaward History now includes events for each time the Subaward Status changes. Previously, the Subaward History only included status changes for Subaward Actions. This will provide more information about when the overall Subaward transitioned through process steps.