Zipline Navigation

Table of Contents
Confused by Zipline terms like “SmartForm” and “workspace”? Review the Zipline Glossary.
Locating Studies
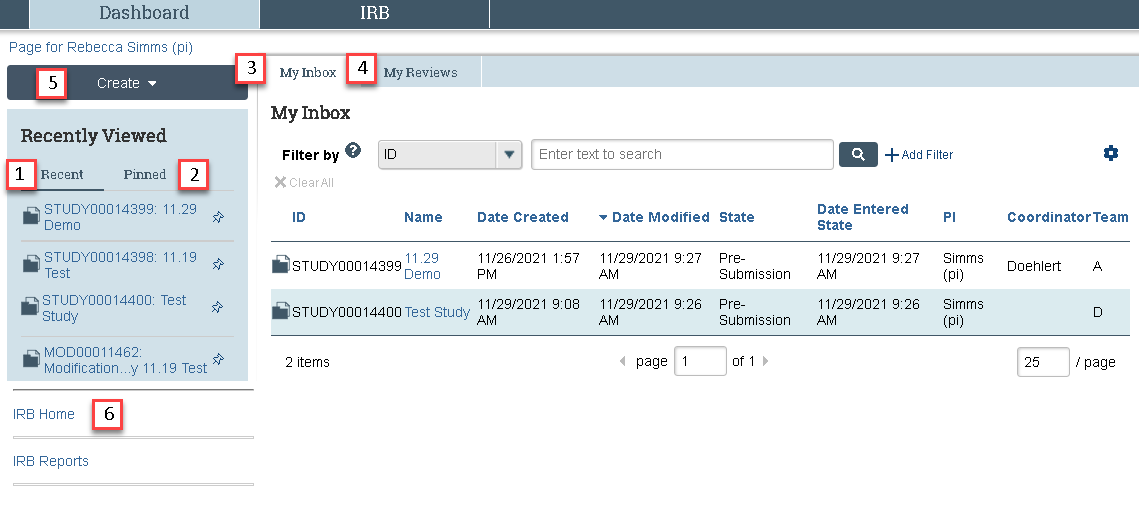
My Inbox contains applications that require you (or your team members) to take action. The most recently viewed submissions and any pinned submissions are displayed in the lefthand column. All other submissions are in the IRB Submissions Library. Both My Inbox and the Submissions Library allow filtering and sorting.
Dashboard
Overview
Users default to the Dashboard after logging into Zipline. You will only see submissions that you have been given access to in Zipline. From the Dashboard, you can:
- Create new submissions
- Access recently viewed or pinned submissions
- View My Inbox
The Dashboard contains:
- The 10 most recently viewed submissions;
- Any submissions that you have pinned for quick access;
- My Inbox, which shows submissions that require action from you or your team;
- My Reviews, which is most useful for faculty advisors and IRB committee members;
- The create menu, used to create new studies and reports of new information; and
- Quick links. Select IRB Home to go to the main IRB menu, which contains the Submissions area and the Meetings area.
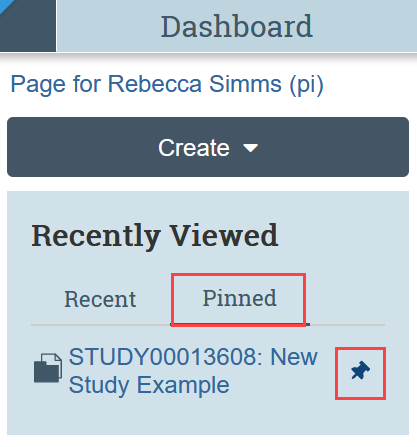
Recently Viewed
The Recently Viewed section in the lefthand column of the Dashboard is split into 2 parts
- Recent- displays the last 10 submissions that you viewed
- Pinned- displays all submissions that you have pinned
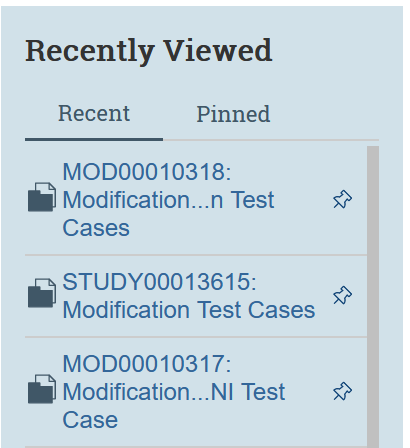
To pin a submission, simply select the thumbtack icon displaying on any recent submission. Only submissions that are in the recently viewed column can be pinned. To unpin, simply deselect the thumbtack icon.
My Inbox
My Inbox displays any applications that require you (or someone on your team) to take action. Look at the State column to identify the reason for the needed action. Click on the name of the submission to open it. See the Action Needed by Submission State table below for an explanation of action needed.
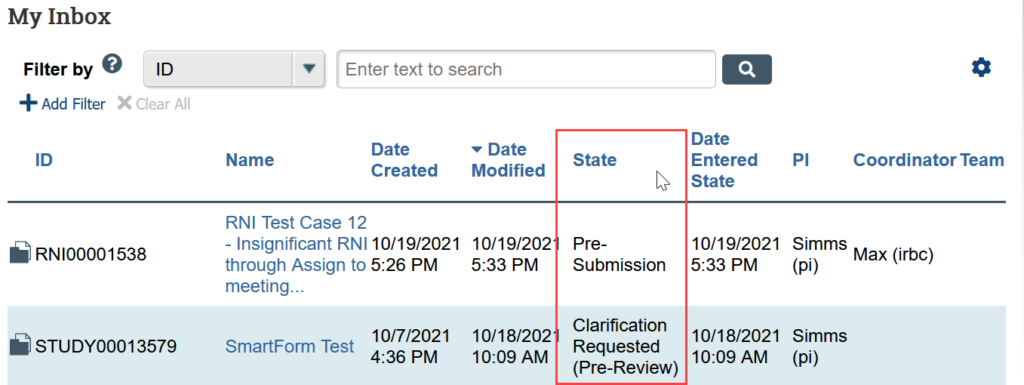
Action Needed by Submission State
| State | Action Needed |
|---|---|
| Pre-Submission | Complete the application forms. The PI or PI proxy must submit to HSD before review begins. |
| Clarification Requested | Edit the SmartForm and attachments to clarify as needed, and provide summary notes to the IRB when submitting the changes. The PI or PI proxy must submit the response.
Note: If the clarification was requested from Committee Review, you can only provide notes. You are not allowed to edit the study. |
| Modifications Required | Modify the application to meet IRB requirements and submit it with changes. The PI or PI proxy must submit the response. |
| Deferred | Review the deferral letter from the IRB. Edit the SmartForm and attachments to clarify as needed, and provide summary notes to the IRB when submitting the changes. The PI or PI proxy must submit the response. |
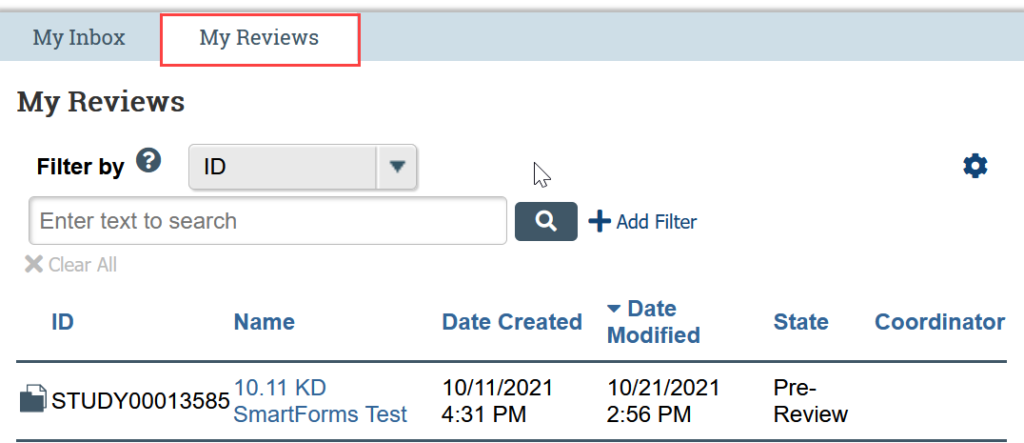
My Reviews
The My Reviews tab displays a subset of the submissions in My Inbox where you have been assigned as a reviewer. This tab is most helpful for faculty advisors and IRB members. For most users, nothing will display in this tab.
IRB Submissions Library
The Submissions area contains all IRB submissions, regardless of type and state. Note that the submissions you see depend on your user permissions.
Step 1: Click the Submission Link under the IRB menu
- Click the IRB Home link in the lefthand column
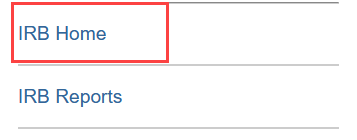
- Or click IRB and then Submissions in the Main Menu at the top of the screen

Step 2: Go to the most relevant tab in the library
- Click the relevant tab in the Submissions Library- if displayed, click the ellipsis to see additional tab options
- If you are unsure which tab to use, we recommend All Submissions
- Review the chart below for an explanation of the Submissions Library tabs

Submission Library Tabs
| Tab Name | Description |
|---|---|
| In-Review | Shows all applications that are currently in the review process for the UW IRB. This includes applications requiring action from anyone, not just you or your team. |
| Active | Shows all studies that have completed the review process and are currently active. This includes studies with lapsed approval and studies with determinations of Not Human Research or Human Research, Not Engaged. |
| New Information Reports | Shows all reports of new information. This includes reports that are in review and reports that have completed the review process. |
| External IRB | Shows all UW studies that are being reviewed by a non-UW IRB, as well as any modifications or updates associated with external IRB studies. |
| Relying Sites | Shows non-UW sites for institutions relying on the UW for IRB review. |
| Archived | Shows all submissions that are no longer active due to closure, termination, being discarded, or being withdrawn. Also includes some studies with a determination of Not Research, Not Human Research, or Human Research, Not Engaged. |
| All Submissions | Shows all submissions, regardless of type or state. |
Step 3: Locate and open submissions
- If desired, use filtering and sorting on the displayed list
- Click the name of the desired submission to open the submission workspace
Using Filtering and Sorting
Many pages contain tables you can filter and sort to help you find the data you want.
- Filtering reduces the list to only the data that meets the criteria. The advanced filter lets you combine multiple filter criteria together.
- Sorting displays the data in ascending or descending order by a particular column.
How to Filter
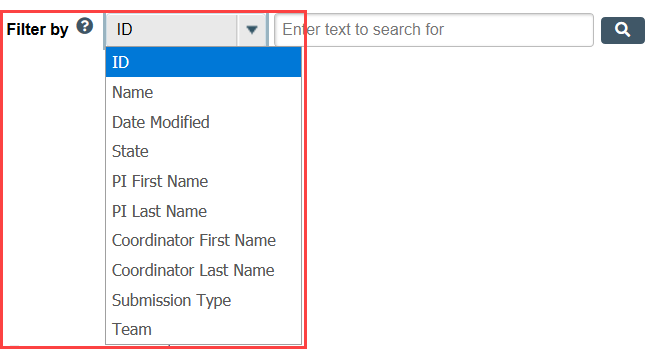
Step 1: Select the column you want to use to filter
- Select the column to filter by from the drop-down menu. The menu only lists columns that you can use to filter.
Step 2: Enter your filter terms
- In the next box, type the beginning characters for the items you want to find. If you do not know the beginning characters, type a % symbol as a wildcard before the characters. Example:
- 71 shows all items beginning with 71
- %71 shows all items containing 71 in any position

- Click the Search icon to apply the filter
- TIP: For examples and a list of operators you can use, click the Help icon.
Step 3: Add additional filters as needed
- In the Filter By area, click Add Filter
- Enter filter criteria. To add additional criteria, click Add Filter again
- Click the Search Icon to apply the filter
How to Sort
Click the column header you want to use to sort. Click it a second time to reverse the sort order. The arrow indicates the column by which the data is sorted and the sort order, either ascending (up arrow) or descending (down arrow).
- Note: If the column header is not a link, you cannot sort by that column.

Navigating in Studies
Navigating the Workspace
Overview
Once you open a study, you see the study workspace. While there are minor differences depending on the submission type, the workspaces are very similar for all types of IRB submissions. The workspace is your access point for:
- Viewing the application contents and details, including all actions performed on it
- Editing the study for applications that include you on the study team
- Performing actions on the application
The figure below identifies the key workspace elements that help you find your way around the IRB system and perform actions on the study.
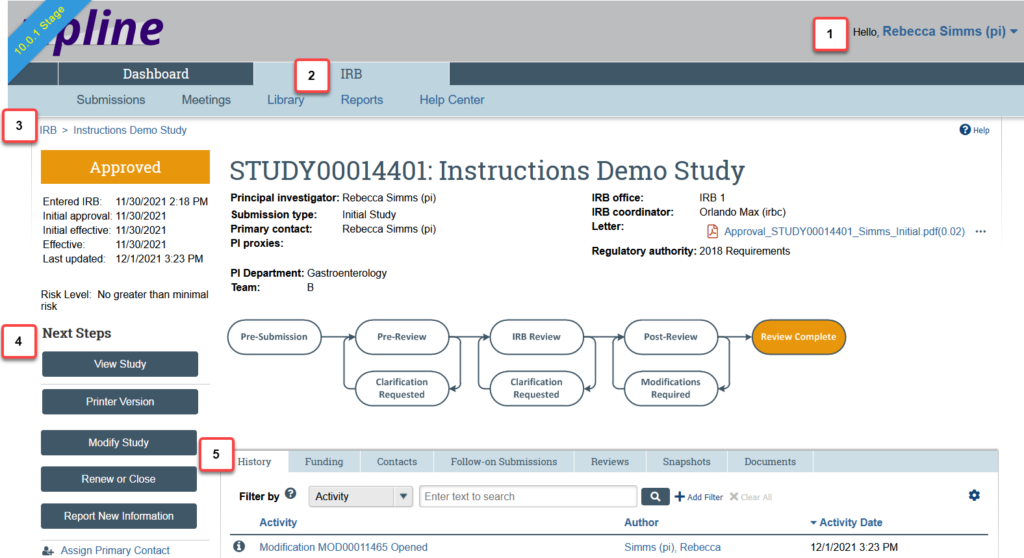
The key elements shown are:
- Header: Provides links to your profile and lets you log off
- Top navigator: Provides links to the major sections of the system that you can access
- Breadcrumb navigator: Tracks your movement through the hierarchy of pages and enables you to quickly move back to a previous location
- Activities: Lets you take appropriate actions—such as viewing the study—based on the study’s current status
- Resource tabs: Gives access to collected study information, such as the study team membership, documents attached to the study, and older versions of the study
High Level Study Information

- The Study State
- NOTE: For Not Human Research determinations, the type is also displayed- Not Research or Not Human Subjects.
- Dates and Approval Information
- Entered IRB: The date when the study went from “Pre-Submission” to “Pre-Review” and entered HSD’s queue for review.
- Initial Approval: The date when the study was first approved. For follow-on submissions, this date refers to the follow-on submission and not the parent study.
- Initial Effective: The date when the IRB decision initially took effect.
- Effective: The date when the IRB decision takes effect. The effective date is most significant when modifications are required before approval, because the research cannot start immediately when the IRB decision is made (the approval date). The effective date is set to the day the modifications are reviewed and accepted.
- Approval end: The end date of the approval period. If it is blank, there is no approval end date and study approval does not expire.
- Last Updated: The most recent date when any change was made to the record.
- The Study ID number and Name: The study ID number is unique to the specific submission. The prefix for the ID number indicates the submission type. There is no relationship between the ID number for parent studies and follow-on submissions.
- The Submission Type: Whether it is an initial application, modification, etc
- Key Contacts
- Principal Investigator and PI Proxy: The principal investigator (PI) for the study and anyone that the PI has designated as a proxy. The PI and PI proxy are the only people who can submit initial applications, continuing review, modifications, or responses to HSD on behalf of the study team.
- Primary Contact: The primary contact receives all notifications related to the study. This role is automatically assigned to the person who initially creates the study in the system, but it can be changed by the study team or HSD staff at any time.
- IRB Coordinator: The HSD reviewer assigned to handle the application from Pre-Review through Review Complete.
- Team: The assigned HSD team for the study.
- Letter: The most recent determination letter from HSD/the IRB. Note that this does not show up until a determination letter has been sent.
- Risk Level: The risk level of the study as a whole. The risk level for follow-on submissions reflects the risk level of the study, not the risk level of the follow-on submission.
- Regulatory Authority: The set of regulatory requirements that apply to the study. Pre-2018 Requirements indicates that the Original Common Rule applies, and 2018 Requirements indicates that the Revised Common Rule applies. If the FDA or DOJ have regulatory authority, this will also be noted.
Resources Tabs
Detailed study information is available under the basic study information. Additional information can be found by viewing the submission SmartForm. It is organized by tabs, and there will be variation in the tabs that are available depending on the type and state of the submission.

The most important tabs are:
- History: The record of every action that has happened in the life of the application. This tab can be filtered and sorted.
- Funding: Overview of all funding that has been added to the study.
- Contacts: List of all contacts for the study. For studies that were created before the 1/7/2020 upgrade, the Study Roles Addendum is available here for reference.
- Sites: For multi-site/collaborative studies only, this lists any site records for institutions with activities being reviewed by the UW IRB.
- Follow-on Submissions: Any follow-on submissions (modifications, continuing review, or reports of new information) that exist for the study.
- Reviews: The most recent review information, including any required ancillary review, such as faculty advisor review. The information you see in the reviews tab depends on your access and permissions.
- Snapshots: Historical snapshots of the application during various points in the life of the study.
- Documents: Most recent versions of all of the attached documents for the study.
Available Actions
Actions available to you will vary depending on your user role and the state of the submission.
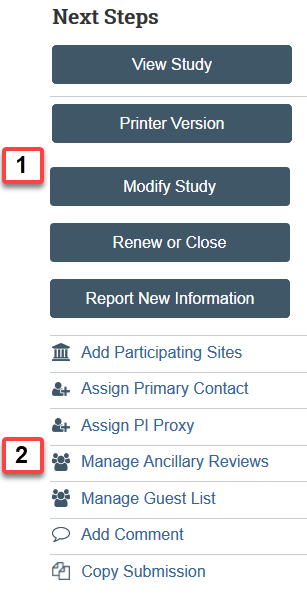
- Top Buttons:
- View or Edit: This button allows you to open the SmartForm to view or edit (depending on the state and your permissions).
- Printer Version: Formats the SmartForm into one printer friendly document.
- Report New Information: Anyone can submit a report of new information.
- Buttons with Action Icons: The actions available to you. This will vary depending on the state and your user role.
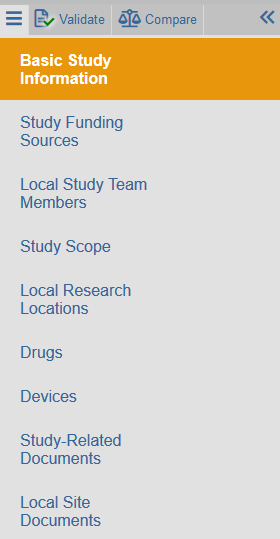
Navigating SmartForms
Zipline applications consist of a SmartForm application and required attachments that are completed and uploaded to the SmartForm. Click View Study (or Edit Study) to see the SmartForm. The forms contain a consistent set of navigation options.
Left-hand Navigator
The navigator persists on screen, but can be collapsed if desired. It lists all the SmartForm steps, or pages, that are available for the application. The current step is highlighted. A back button is not available- instead simply click the link to go to the desired page.
Basic Actions
The Exit, Save, and Continue buttons maintain a fixed location in the bottom right portion of the screen as the user moves through the SmartForm steps.

The print button allows for printing the current step or the entire SmartForm.
![]()
Finding Study Documents
Once your study is approved in Zipline, you will always find the most current approved version of the study documents in the initial study record.
- When you submit a modification: The new version of any revised document, such as the IRB Protocol or consent form, is automatically pushed to the initial study record once the modification is approved.
- When you submit a continuing review: Any documents that are attached to a continuing review, such as the status report form, are not pushed to the initial study record. Instead, continuing review documents are available in the Documents tab of the continuing review.
Step 1: Open the initial study record
- Locate the study in Zipline and click on the study name
Step 2: Go to the Documents tab in the study record
![]()
Documents are divided into 2 sections depending on where they were uploaded in the SmartForms- Study Related Documents and Site Related Documents.
*To find site-specific documents for a relying non-UW institution, go to the Documents tab in the related Site record.
**This contains all documents uploaded by the study team as a part of the application process and some documents uploaded by HSD staff, such as finalized Reliance Agreements and Information for Researchers.
Step 3: Locate needed document
A. Category: All documents are sorted by category. Most documents are assigned a category based on where they are uploaded in the study SmartForm.
B. Draft: The draft version of the document contains any previous tracked changes.
C. Final: The final version of the document contains HSD’s watermark for any consent materials.
D. Last Finalized: The date that HSD last reviewed and approved the document.
E. Document History: Easily access any previously uploaded versions of the document.

Navigating Between Studies and Follow-on Submissions
Once a study is in Zipline, it may have follow-on submissions associated with it. Follow-on submissions, such as modifications or continuing review reports, do not stand alone but instead contain additional information about the parent study.
To Find Any Follow-on Submissions Associated with a Study:
- From the study workspace, click on the Follow-on Submissions tab. Note that there may not be a Follow-on Submissions tab if there are not any follow-on submissions associated with the study.
![]()
- Click on the name of the Follow-on submission to go to that submission’s workspace.
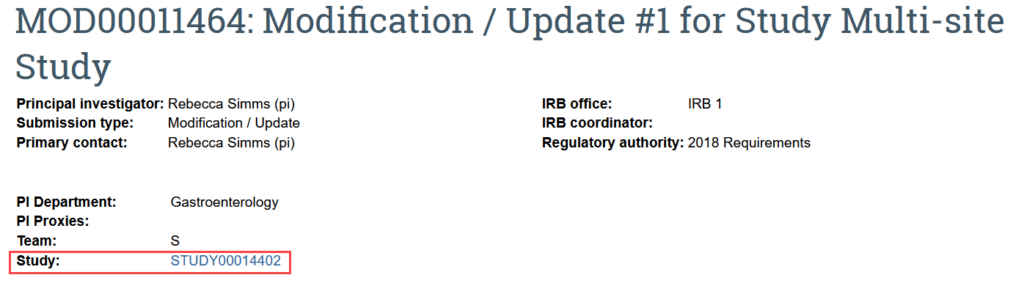
To Find the Parent Study from a Modification or Continuing Review workspace:
- Use the link to the parent study provided in the follow-on workspace
To Find the Parent Study from a Report of New Information (RNI) workspace:
- From the RNI workspace, click on the Related Submissions tab. Note that RNI may not have any related submissions.
![]()
- Click the name of the related submission to go to that submission’s workspace.
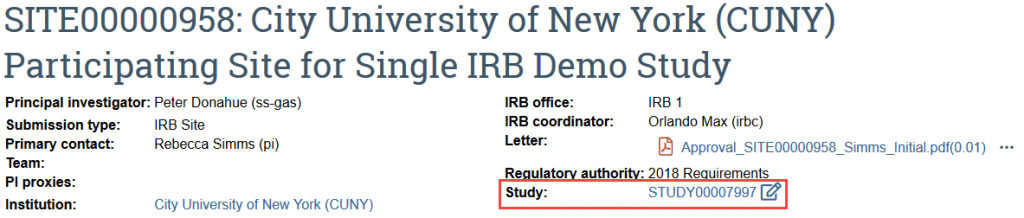
Navigating Between Studies and Sites
Multi-site and collaborative studies have a main parent study record with additional site records for each involved institution.
To Find Sites Associated with a Study:
- From the study workspace, click on the Sites tab
![]()
- Click on the name of the site to go to the site’s workspace
To Find the Parent Study for a Site:
- Click the link to the study in the site workspace