The abstract, also known as the project summary, should be a clear, concise outline of problem & objectives with expected outcome of the proposed project.
Abstracts are typically part of a proposal. There is also a section for a UW abstract in the eGC1. These two sections should match. In the absence of an abstract requirement in a proposal, the eGC1 abstract should be a high-level description of the scope of work. Some sponsors like NSF require the project summary to address the intellectual merit & broader impacts that will result.
A UW abstract in the eGC1 is required for all Proposal and After-the-Fact eGC1s. Classified, confidential, or proprietary information should not be included in this section.
The abstract field does not have a word limit.
Request for Application/Proposal or Program Announcement
For a standard eGC1, you must complete all of these fields. If a particular field is not applicable to your proposal, enter some text, such as N/A, to indicate that.
For Grant Runner applications, these fields, and the ones described below will be auto-populated with data based on the opportunity you selected.
Please include this information for the originating (prime) sponsor if the UW will be a subrecipient on a project proposal. Please upload a PDF copy of the funding announcement on the Attached Documents page for historical purposes since URLs often expire.
Field
Description
RFA/RFP/PA Number
Enter the Request for Application (RFA), Request for Proposal (RFP), or Program Announcement (PA) number provided by the sponsor.
For Grant Runner applications, this information will be pre-populated and read-only.
Funding Announcement Title
Enter the title of the funding announcement.
For Grant Runner applications, this information will be pre-populated and read-only.
Funding Announcement URL
Enter the web address (URL) if the sponsor has specific information about this funding announcement on its web site.
For Grant Runner applications, this information will be pre-populated and will be editable.
Additional Fields for Grant Runner Applications Only
Field
Description
Competition ID
The form set used for this opportunity; this information will be pre-populated and read-only.
Opening Date, Closing Date
The dates for the funding opportunity that are selected; this information will be pre-populated and read-only.
Activity Code
The Activity Code for the funding opportunity that is selected; this information will be pre-populated and read-only.
Calculate and enter the amount of Direct Costs to which the F&A cost rates will be applied. This may be Modified Total Direct Costs (MTDC), Total Direct Costs, or zero (no F&A costs charged). Use the sponsor guidelines and GIM 13 to determine which method of calculation you should use. For Industry Sponsored Clinical Trials, apply the 35% indirect cost rate to the TOTAL direct costs. This includes items often listed in subcategories (for example: IRB review fees, IRB processing, pharmacy set-up, study start-up fees).
F&A cost rate
Enter the F&A cost rate that applies to your proposal (for example, 55.5%). Enter Multiple in this field when:
Your project includes multiple locations, each with its own rate and GIM 13 allows you to use a split rate
More than one F&A negotiated rate is in effect for the period in question
Total F&A costs
Calculate and enter the F&A costs for the first budget period and the total for all budget periods. SAGE Budget calculates F&A costs automatically for you.
This pop-up window displays the investigator’s disclosure history for the past year. It displays when you click the Investigator Disclosure History link for a specific personnel on the PI, Personnel, & Organizations page.
The Investigator section lists the person’s name and employee number.
The One Year Disclosure History section displays a table of disclosures with the following information.
Field
Description
Disclosure Submitted
The date the investigator completed this disclosure.
Disclosure Number
The unique number assigned by the Financial Interests Disclosure System (FIDS) to the disclosure when it was created.
Primary eGC1
The number of the eGC1 associated with this disclosure. If the disclosure is not associated with an eGC1 then “(not available)” is displayed.
Review Status
The current status of the disclosure.
FCOI Status
The result of the disclosure’s review.
Below is an example of a One Year Investigator Disclosure History screen with the disclosures from the past year listed:
If an investigator has never completed a disclosure in FIDS, or has not completed one in the last 12 months, the following screen will display:
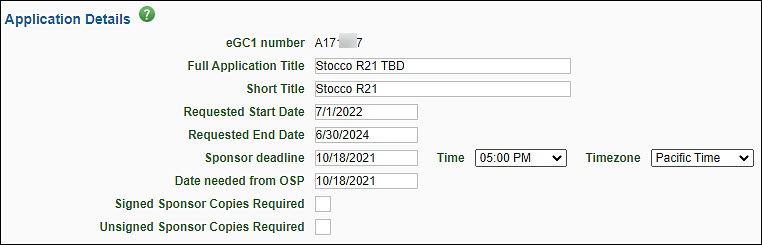
The Application Details section provides basic information for the Office of Sponsored Programs (OSP), Grant & Contract Accounting (GCA), and campus reviewers. The following image shows this section.
Field
Description
eGC1 Number
A unique, system-generated number used to identify an eGC1 and application. It is used in OSP correspondence.
Full Application Title
Enter the complete project title of the application. This title must match the title on the sponsor application. Refer to the sponsor’s instructions for the length permitted. Maximum of 255 characters.
Short Title
Enter a short title (no more than 22 characters, usually assigned by the PI or department) to identify the project within the UW financial system. Upon award, this will form part of the name for the award line(s) in Workday.
Requested Start and End Date
Enter the anticipated beginning and ending dates of the project period. These dates must match the dates on the sponsor application. Specific dates should be used for Royalty Research Fund (RRF) Applications.
Sponsor Deadline
Enter the final date the sponsor will accept the application, including the time of day and the corresponding time zone. OSP recommends routing draft proposals for initial review, so they arrive In OSP at least seven business days ahead of a sponsor deadline. Your unit may have earlier deadlines to meet a GIM 19 deadline. Refer to GIM 19: Internal Deadlines for Proposals to Outside Agencies for more information as well as examples on how to calculate the deadline. Note, OSP disregards this field for After-the-Fact eGC1s which rarely have a sponsor deadline.
Route:
eGC1s with all final administrative elements at least seven business days before the sponsor deadline.
A complete, final proposal and eGC1 marked ‘Ready to Submit’ no later than 5:00 PM Pacific Time, three business days before the sponsor deadline. See: Is my eGC1 ready to Submit?
OSP disregards this field for After the Fact eGC1s. If the sponsor does have a deadline for award acceptance, include an explanation in the Additional Information section (eGC1 Certify Route section).
Date Needed from OSP
OSP recommends you disregard this optional field. OSP reviewers primarily handle eGC1s on a first-in first-out reviewed basis.
Signed and Unsigned Sponsor Copies Required
This field is an artifact of paper proposal submission. Always check the sponsor’s submission method guidelines to determine what is required. If a sponsor does require signed physical copies of the proposal documents, include an explanation in the Additional Information section on the eGC1’s Certify & Route page.
This is used by the system and OSP to classify and organize eGC1 materials. It helps to link related applications to one another (for example, a new application with all its revisions, continuations, and renewals) for improved tracking and reporting.
Note: regardless of application type, if the Sponsored Program Activity Type is “IPA/JPA/Staff Assignment” then the application is non-competing.
Select the appropriate type from the drop-down menu. This is a required field.
Pre-Application
When submitting a preliminary proposal that may lead to a full application. An eGC1 is only required when the pre-application requires authorized official (AO) submission/sign-off or that contains budget details.
New
Use for brand new funded or unfunded applications.
Transfer from Another Institution
When a PI is transferring an existing application or award being transferred from another institution or entity to the UW.
Competing Revision
For a significant change to an existing project that requires application submission and sponsor approval.
Non-Competing Revision
Replacing most or all of previously submitted proposal or to change PI on a proposal after submission but before an award. Review guidance on how to request a change of PI.
Resubmission (Previously Denied)
When reapplying after a prior proposal was not awarded by the sponsor. This is a competing application.
Competing Renewal
When applying to renew a project beyond its original period with a new competitive application. This is a competing application.
Non-Competing Renewal
Do not select this field. It no longer applies to eGC1s. Items that require OSP review on an active award should come to OSP on an Award Modification. Review the FAQ when do I need an eGC1? for more information.
Supplement and Extension
Use to request additional funds and time for an existing award that requires an application process.
Competing Supplement
Competitive application to request supplemental funds to an existing award.
Non-Competing Supplement
Use to request additional funds without a new competition. For example: for an NIH administrative supplement.
Non-Award Agreement
New
Typically used for agreements that support a main (unfunded or funded) UW sponsored program. Example agreement types include:
Confidentiality Agreement
Data Use Agreement
Material Transfer Agreement
The following unfunded sponsored programs must also be submitted as a non-award agreement:
Unfunded Collaborative Agreement
Unfunded Research Agreement
Continuation
Use for amendments to existing, fully executed non-award agreements.
Note: Select Non-Award Agreement (continuation) to extend an existing agreement beyond the initial term.
When you select an NAA type, you will see a prompt that reads “Budget & Fiscal Compliance entries will be cleared. Do you wish to Continue?” This is to remind you that nothing should be entered on the Budget & Fiscal Compliance page. The system will delete any data that was there.
The system will automatically check the After-the-Fact box for an NAA application type.
Check this box if the sponsor has already funded this application, or has sent an award letter, or provided an agreement for UW review. An eGC1 is required for all sponsored programs, including after-the-fact.
Cost Share is the portion of a project or program cost that the sponsor does not pay for. It is the University’s share in the cost of conducting the project/program. Cost sharing occurs either when a sponsor requires, or the University volunteers in a proposal, funds beyond those awarded by the sponsoring agency to support a particular grant or contract.
These costs are charged to an alternate source (UW or third party). You must identify all sources, and they must agree (via the eGC1 approval process) to commit the necessary funds. For more information, review the GCA Cost Sharing Page or the GIM 21 Cost Sharing Policy.
This page is used to indicate the types and amounts of any cost sharing for this proposal.
Note: When the Fiscal Compliance question F-3 is answered Yes, then cost sharing information is required and the fields will become editable.
Cost sharing occurs when the research grant does not pay for all allowable expenses (personnel, tuition, equipment or services). For detailed information on cost sharing, see the GCA Cost Sharing Page or GIM 21 Cost Share on Sponsored Programs.
When applicable, the PI or department must complete and submit the eGC1 Cost Sharing Addendum to OSP at the time of award. If OSP has not received this form before they send the Funding Action to GCA, then GCA will set up the account with restricted 02 status. GCA will block any related advance budget requests.
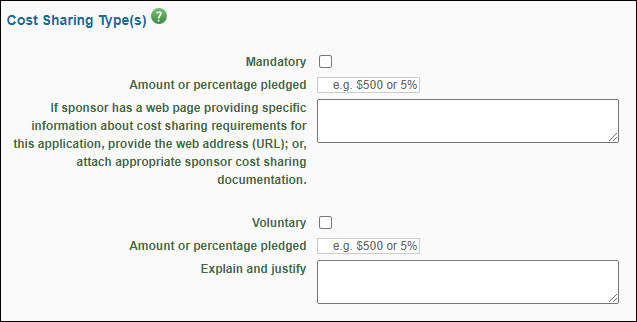
Cost Sharing Types
Cost sharing occurs when the research grant does not pay for all allowable expenses (personnel, tuition, equipment or services). For detailed information on cost sharing, review the GCA Cost Sharing Page or the UW Cost Sharing Policy.
See the sponsor’s guidelines for this information. The University discourages cost sharing commitments when not required by the sponsor.
Field
Description
Mandatory
Check this box if mandatory cost sharing is required by the sponsor as a condition of the award.
Amount or percentage pledged
Enter the dollar amount or percentage of the direct cost required for cost sharing by the funding sponsor.
If sponsor has a web page…
Enter the web address (URL) for the sponsor’s page that provides specific information about their requirements, if available. Otherwise, attach appropriate sponsor cost sharing documentation.
Voluntary
Check this to indicate voluntary cost sharing, which is a voluntary contribution of effort or other costs offered by the Principal Investigator (PI) but not required by the sponsor as condition of the award.
Amount or percentage pledged
Enter the dollar amount or percentage of the direct cost voluntarily contributed toward this project. Because the sponsor does not require this as a condition of the award, the University discourages this type of cost sharing.
Explain and justify
Enter an explanation for this cost sharing.
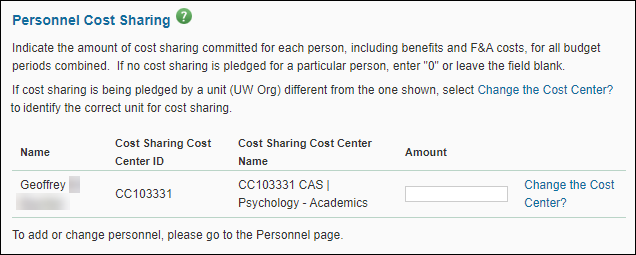
Personnel Cost Sharing
Personnel cost sharing refers to amounts committed by any UW unit for personnel salaries (plus benefits and Facilities & Administrative costs). This table reflects personnel entered on the Personnel screen.
By default, personnel cost sharing is assigned to the individual’s home or primary department. If the cost sharing source is not the home department, click the Change the Cost Center? link to identify the correct unit, and provide an explanation in the Additional Information box on the Certify & Route page.
The information displayed is the person’s name and the Cost Sharing Cost Center ID and Name for the person’s primary department.
Use the Amount field to enter the dollar amount of the cost sharing for this person, for all budget periods combined. If there is no amount, leave the field blank.
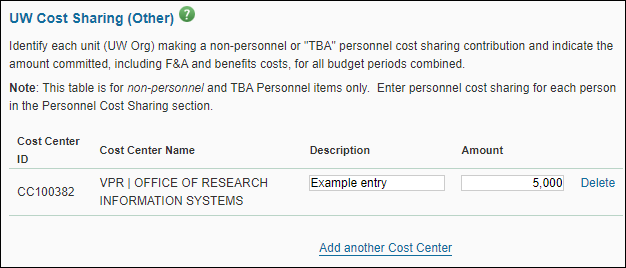
UW Cost Sharing (Other)
UW cost sharing refers to non-personnel (non-salary) and “TBA” (to be assigned) Personnel items only. You enter Personnel (salary) cost sharing in the Personnel section.
Add a Cost Center
Click the Look Up Cost Center button to open the Cost Center Chooser and search for and select a department or unit. The selected Cost Center ID and Name will display.
Enter a Description and Amount for this item (direct costs plus the third party’s F&A costs) for all budget periods combined.
To add another department or unit, click the Add another Cost Center link.
Delete a Cost Center
Remove an existing entry by clicking the Delete link to its right.
Addendum Form
In addition to entering cost sharing data on the eGC1, you must complete the Cost Sharing Addendum form and submit it to OSP at the time they are reviewing the application.
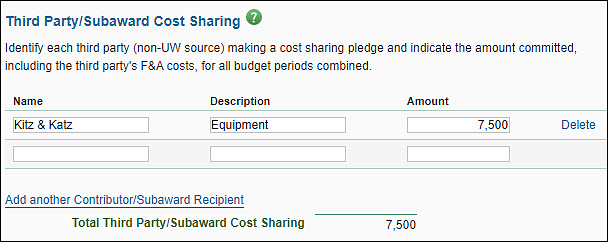
Third Party Cost Sharing
Third party cost sharing is an amount that a non-UW source has committed. For each contribution, enter appropriate information and attach a letter of commitment from the third party source on the Attached Documents page.
To add rows, click the Add another Contributor/Subaward Recipient link. Add a Description of the item, and the total dollar Amount (direct costs plus the third party’s F&A costs) for all budget periods combined.
To delete an existing entry, click the Delete link to right of that entry.
Unrecovered F&A Costs
Sometimes the University’s Facilities & Administration (F&A or indirect cost) rate is higher than the rate agreed to on an award. As a result, the University is awarded F&A Costs at lower than the negotiated rate. In this situation, the University ends up with a shortfall called “unrecovered F&A costs.” Some sponsors allow this shortfall to be applied as a cost share contribution.
If you are entering unrecovered F&A costs as cost sharing, you must complete the eGC1 Cost Sharing Addendum form. On the addendum, be sure to indicate the source of cost sharing as “unrecovered F&A costs.”
You may use Unrecovered F&A costs as a source of cost sharing if the sponsor guidelines indicate that “unrecovered F&A costs” are a valid cost sharing contribution or if prior sponsor approval is obtained. See the GCA Unrecovered Indirect Cost Page for more information.
Enter the unrecovered F&A cost amount.
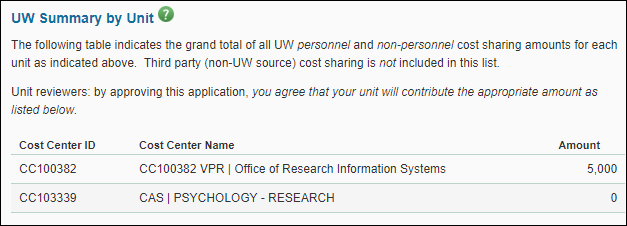
UW Summary by Unit
This section displays the grand total of all UW personnel and non-personnel cost sharing amounts for each UW unit (by Cost Center). The total does not include Third Party amounts.
For each unit, the system displays the Cost Center ID, Cost Center Name, and Amount.
Total Cost Sharing
This section displays the total cost sharing from all UW sources (personnel and non-personnel), third party sources and Unrecovered Facilities & Administration (F&A) costs. This amount is automatically calculated by SAGE.
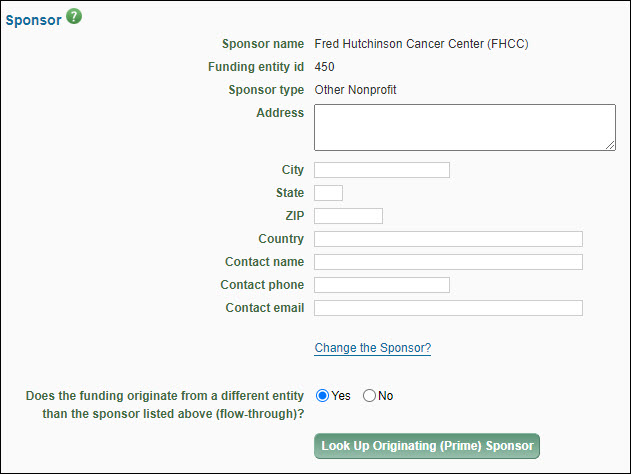
The sponsor is the entity or agency to which you are applying for funding.
Note: To reduce returns, sponsor information should be checked for accuracy prior to routing an eGC1.
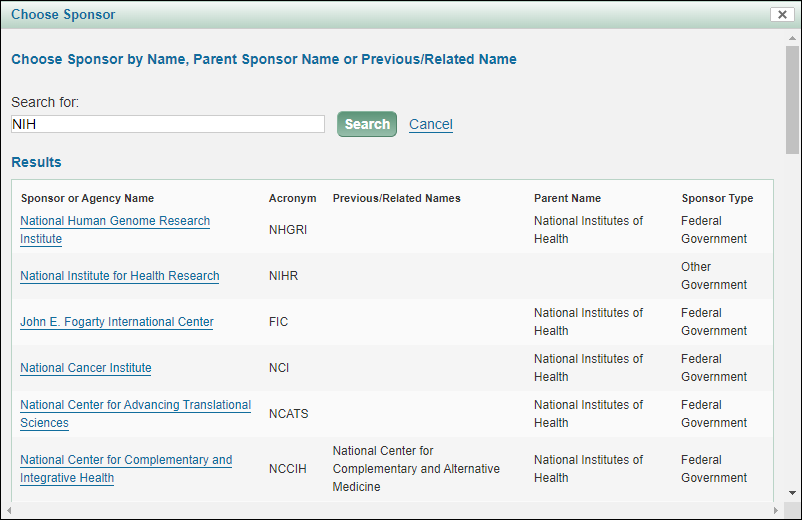
Select the Look Up Sponsor button to open the Sponsor Chooser.
Note: For a Grant Runner application, you will have selected the sponsor in the wizard.
Enter text in the search box. SAGE will look for a match within the following fields:
Sponsor or Agency Name
Acronym
Previous Names
Related Names
Parent Name
The results list will display the following data for each match, if available:
Sponsor or Agency Name
Acronym
Previous/Related Names
Parent Name
Sponsor Type
Select the desired Sponsor from the results list. The modal will close and the data for your sponsor will display in your eGC1.
Note: Sponsors populated in SAGE are also required to be maintained in the Funding Entity Core Data Management (FECDM) database. If the sponsor does not exist in the FECDM database with a Funding Entity ID, an alert will appear in the Funding Entity ID field notifying you that an update is required.
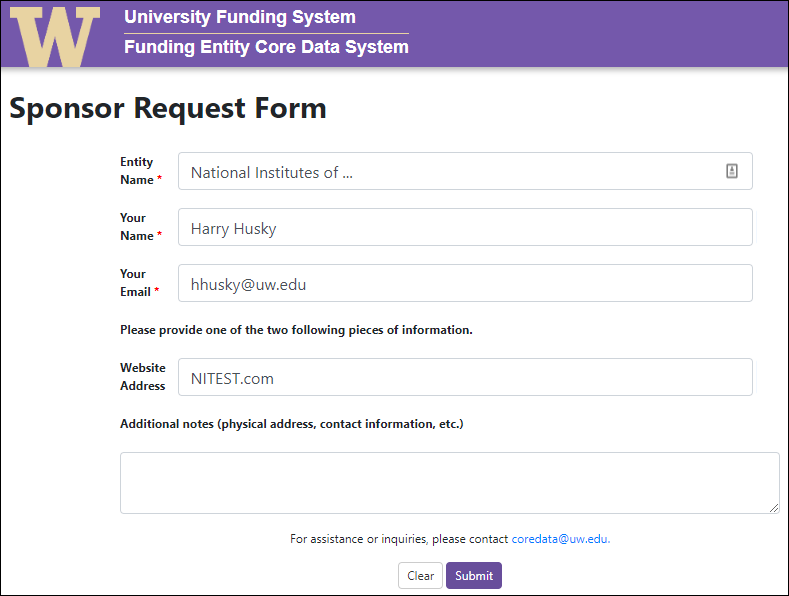
If you cannot find your sponsor or the alert “Update Required” displays in the field, select “Request sponsor setup in Funding Entity System” to request that your sponsor be added to the FECDM database. The following is an image of the form that will open:
Fill out the required fields of Entity Name (sponsor name), Your Name, and Your Email. Also provide the sponsor’s Website Address, as well as any additional information about the sponsor to be included in the database. Select Submit to send this request to a FECDM administrator; the sponsor will be created in the FECDM database and selected in SAGE within 24 hours.
Once you’ve selected the sponsor, the Sponsor name, Funding Entity ID, Sponsor type, and Parent sponsor name (if there is one) display.
The Sponsor address and contact fields are not required, but we strongly recommend that you fill them in, as the values are used in the sponsor cover letter created by OSP and when OSP needs to contact the sponsor for agreement negotiations.
For the Address, City, State, Zip, and Country fields, enter the application mailing address of the sponsor as it appears in the sponsor’s application instructions or enter the name and web address (URL) of the sponsor’s electronic proposal submission system (for example, ASSIST, Grants.gov, Research.gov) in the Address field.
For the Contact Name, Contact Phone, and Contact Email fields, enter the information of the person to be contacted with questions or issues (optional).
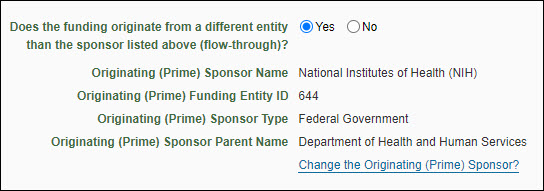
The following image shows the Originating Sponsor information:
Note: NAA eGC1s should select No to answer “Does the funding originate from a different entity than the sponsor listed above (flow-through)?”
The application is for a specific investigator-initiated project with minimal programmatic involvement from the grantor (sponsor). See Glossary entry for details.
Contract
The application’s funding mechanism is a contractual arrangement with specific deliverables and expected outcomes which benefit the sponsor. See Glossary entry for details.
The application is for a federal assistance agreement mechanism that has substantial programmatic involvement by the federal agency. See Glossary entry for details.
Other Transaction Authority (OTA)
The application is for a special award mechanism from certain federal agencies that is not a grant contract, or cooperative agreement. See Glossary entry for details.
Select a value from the drop-down menu. It is organized by Institutional Activity Types: Organized Research, Instruction, and Other Sponsored Activity. Review the details on Sponsored Program Activity Types in GIM 13 to accurately select the category. These categories determine which F&A rate applies to your project, impacts which terms and conditions apply to the award, and specific reporting requirements.
Institutional Activity Types
Sponsored Program Activity Types
Organized Research
Research: Basic
Research: Applied
Development
Fellowship: Research Undergraduate
Fellowship: Research Graduate/Professional
Other Training: Research
Clinical Trial: Federal Sponsors
Instruction
Training and Development (UW Internal)
Fellowship: Non-Research Undergraduate
Fellowship: Non-Research Graduate/Professional
Other Sponsored Activity
Professional Development/Public Service (UW External)
Construction
Equipment
Clinical Trial: Non-Federal Sponsors
Other Sponsored Activity
IPA/JPA/Staff Assignment
IPA/JPA/Staff Assignments should be routed as an After-the-Fact eGC1. For Staff Assignments review instructions & guidance for Affiliated & Collaborating Institutions.
Clinical Trial Phase
When you select Clinical Trial: Federal Sponsors, or Clinical Trial: Non-Federal Sponsors, you will be prompted with this new drop-down to select the appropriate Clinical Trial Phase. Review the Clinical Research page for definitions of Clinical Trial Phases. This field will display if you select either of the Clinical Trial values for SPA Type. Select the appropriate value. Choices are: I, II, III, IV, and Other.
Use this section to provide information about tangible items involved in a project, such as equipment and biological materials. This information helps reviewers understand export control and budgetary implications as well as informing protections that need to be in place for any sharing of tangible items outside UW. Contact Equipment Inventory Office with specific questions about fabricating equipment, or email exports@uw.edu for guidance on export controls.
Review more information and guidance on responding to the eGC1 compliance question from the Office of Research:
As with other eGC1 pages, you can partially complete your entries and save the eGC1. You must complete the required fields before you route your eGC1 for approval.
Select Start Section to open the section initially, and then Edit Section to add or update existing data.
E-1. Will equipment be fabricated by the UW on this project?
Answer: Yes or No
Note: if the fabrication is being performed entirely by a non-UW entity (that is, a subcontractor), answer “No”.
E-2. Will this project involve the sending or taking of hardware, equipment, goods, software, monies, biological or chemical materials out of the U.S.? (excludes UW owned laptops and cell phones)
Answer: Yes, No, or Unknown
Note: Answer “No” for personal-use laptops unless the laptop contains any military or space technical data, or if the only international transactions are for travel expenses.
E-2A displays if E-2 = Yes
E-2A. Describe the items/materials
Answer: enter a description
E-2B displays if E-2 = Yes
E-2B. Add one or more destination countries
Answer: search for by name, and select the appropriate countries
M-1. Will University-owned biological materials be provided to non-UW parties, including sponsor?
Answer: Yes or No
Note: Materials include (but are not limited to) cell lines, cultures, bacteria, nucleotides, proteins, transgenic animals, pharmaceuticals, or chemicals.
Use this section to indicate if and how specific types of information and technologies will be involved in the project so that reviewers can determine if special guidelines or restrictions apply. Contact exports@uw.edu for guidance on export control limitations related to sharing of data and technology. For information about the Washington Innovation Advantage Program (WIAP), visit the CoMotion site or contact osp@uw.edu with further questions.
Review more information and guidance on responding to the eGC1 compliance question from the Office of Research:
As with other eGC1 pages, you can partially complete your entries and save the eGC1. You must complete the required fields before you route your eGC1 for approval.
Select Start Section to open the section initially, and then Edit Section to add or update existing data.
D-1. Does this project involve any of the following?
Answer: Check all that apply:
UW Background Intellectual Property
UW Medicine Patient Data
Proprietary non-technical information shared with the University of Washington
Export controlled/proprietary technical information or source code shared with the University of Washington that is not intended for publication
Controlled Unclassified Information (CUI)
Federal Contract Information (FCI)
Classified information – National Security Information
Other sensitive information
None of the above
You must make at least one selection. If “None of the above” is selected, the system will clear any other boxes that were checked.
D1-A displays if for D-1 you select any value other than “None of the above”
D-1A. Will this information be shared with foreign nationals in the United States or abroad (including UW faculty, staff, or students)?
Answer: Yes or No
Note: U.S. Permanent Residents are not considered foreign nationals. The actual country of citizenship/residency of foreign nationals is not required at this time.
D1-B displays if for D-1 you select “Other Sensitive Information”
D1-B. Please describe the other sensitive information
D-2. Does this project or related items have known military/defense or space applications, or will you assist a foreign country’s military or space activities?
Answer: Yes or No
D-2A displays if D-2 = Yes
D-2A. Please describe.
D-3. As far as you know, will the sponsor require approval prior to foreign national participation or prior to publication of the research results of this project?
Answer: Yes or No
D-4. Will the project involve travel to or collaboration with a person or entity in a sanctioned country or region? (e.g., Cuba; Iran; North Korea; the following regions of Ukraine: Crimea, Donetsk, Luhansk)
Answer: Yes or No
Question T-1 displays if the Sponsor Type and/or Originating Sponsor Type (as indicated on the Details page) is one of the following: