Note: You will see the same dialog window for both Approvals and Returns. For details on returns, see the Return an Application article.
When you have completed your review of an “In OSP” status application and it is ready for submission to a sponsor, you can change its status to “Approved.”
NOTE: A standard (non-Grant Runner) application can be approved when in Routing status. The approval dialog window will display the warning message “This application has not yet been approved by all associated organizations on campus.” You should not do this unless there are special circumstances.
To approve an application:
- From the left navigation menu of an open application, click Approve/Return.
- Under Application Details, review the summary information to ensure you are processing the correct application.
- Under OSP Notes, add any comments pertaining to this approval. These notes will appear on the History & Comments page.
- From the drop down menu, choose the location of File. You must reassign an application when approving.
- Finally, click Approve.
Once you approve an application, the research team can no longer withdrawn it and OSP cannot return it.
Note: The research team is not automatically notified when you approve an application.
You must attach the application to a cycle when you approve it, if it hasn’t been already. When you click Approve, a new window will display with a choice to create a new cycle or search for an existing cycle to attach the application to.
Any personnel changes made by campus to the PI, Personnel, & Organizations page after the application has been approved will be listed on that page.
For information about campus approvals and compliance reviewers, see the Approvals section.
In SPAERC, you can change the status of an approved application to Awarded, Denied by Sponsor, and Permanently Withdrawn. You may also view the status history.
Change Status to Awarded
When a sponsor notifies OSP of a project award, you can create a funding action as the child of the appropriate application. When you send (or re-send) the funding action to GCA for processing, the application’s status automatically changes to Awarded. The pink banner in the application will now display “Awarded.”
Change Status to Denied by Sponsor
When you receive notification that the sponsor denied funding for a project, you should change the status of the application to “Denied by Sponsor”.
- From the left navigation menu of the open application, click Sponsor Decision.
- Check the information under Application Details to make sure you are processing the correct application.
- Enter comments in the OSP Notes field regarding the status change. When you change the status of an application to Denied by Sponsor, you must enter comments.
- Click Denied By Sponsor.
This process changes the application status from Approved to Denied by Sponsor. The pink banner will change to “Denied By Sponsor.” The system does not automatically change the individual and group/team assignments for the application. You should assign a denied application to File.
Change Status to Permanently Withdrawn
Occasionally, you may need to withdraw an approved application.
- From the left navigation menu of the open application, click Permanently Withdraw.
- Check the information under Application Details to make sure you are processing the correct application.
- Enter comments in the OSP Notes field regarding the status change. When you change the status of an application to Permanently Withdrawn, you must include comments.
- Click Permanently Withdraw.
This process changes the application status from Approved to Permanently Withdrawn. The pink banner changes to “Permanently Withdrawn.” The system does not automatically change the individual and group/team assignments for the application.
To view status history
From the open application, click the Status tab.
For messages that you often send to campus and sponsors, SPAERC provides a set of automatically generated documents (AGD) for you to customize.
A document is either an email which the system will send or a letter created as a PDF for printing. The system captures a copy of the communication and automatically attaches it to the related item.
For many of the documents, specific data from the item pre-populates email addresses, dates, sponsor names, proposal titles, and other information. You can edit this pre-populated information.
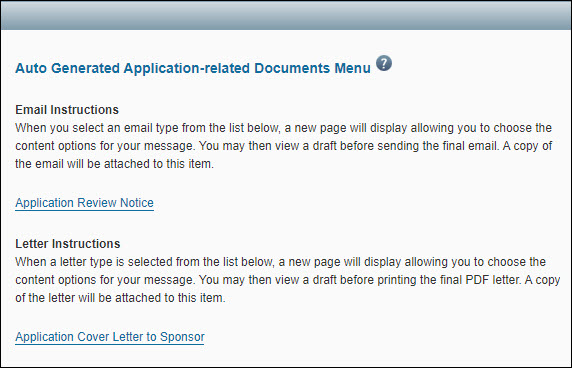
Available Auto Generated Documents
Applications
- Application Review Notice: use this email to send review comments to the Principal Investigator, Administrative Contact, Pre-Award Budget Contact, and eGC1 Preparer.
- Application Cover Letter to Sponsor: print this PDF-formatted letter and mail it to the sponsor in support of the application. The PDF file includes the UW letterhead. The eGC1 Campus Comments (entered in SAGE) display for reference at the top of the customization page. (They also appear on the Control Sheet.)
Funding Actions
- Notice of Award: use this email to send information about the award received to the Principal Investigator, Administrative Contact, Pre-Award Budget Contact, and eGC1 Preparer.
- Request for Activation Notice – fellowships: use this email to notify the PI of a fellowship award and request the PI to complete the Activation Notice.
- Research Agreement Acknowledgement: use this as a cover letter for the sponsor’s agreement sent to ensure the PI understands the terms. This is for industry sponsors.
- Sponsor Document Cover Letter: send this to the sponsor with the signed copies of the agreement.
Admin Actions
- SFI Compliance Notification: send this email to the PI about SFI disclosure for a budget extension.
- Sponsor Document Cover Letter: send this letter to the sponsor with the signed copies of the agreement.
Subawards
- Email Notification: send this email to the PI with attachments concerning the subaward.
- Notice to NIH: send this letter to NIH about the financial disclosures of the PI and the subrecipient.
- Cover Letter: send this letter to the subrecipient with the subaward agreement.
- Bilateral Modification/Amendment: send this email to the subrecipient with the appropriate attachments.
- Unilateral Modification/Amendment: send this email to the subrecipient with the appropriate attachments.
- Bilateral Subaward: send this email to the subrecipient with the appropriate attachments.
- Unilateral Subaward: send this email to the subrecipient with the appropriate attachments.
Create an Auto Generated Document
- From within an open item, click the Auto Generated Documents tab.
- The page will open and display a list of email and/or letter choices.
- To select the email message or letter you wish to create, click its link.
The email or letter draft will display. You can edit most of the suggested content.
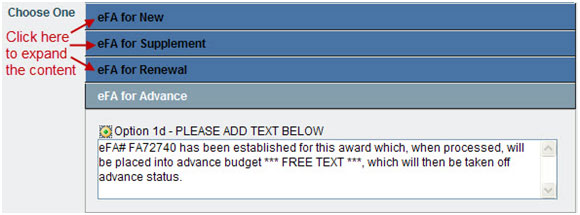
Note: You will need to add content wherever you see three asterisks on either side of a description, such as *** FREE TEXT ***.
Document Section Types
- Pre-populated values such as the PI’s email address or the sponsor’s name and address. You may edit them if necessary.
-
- Paragraphs which may be complete as given, or may require the addition of specific information such as a date or amount of award.
For example, the Subject or Opening as shown in the following image.

- Choose One options allow you to select one section of content by clicking the radio button; you may edit the content. By default, some information is not displayed. To expand these sections, click the blue boxes.
- Choose Any options allow you to select one or more content sections by checking the box(es); after you select a section, you may edit the content.

Finalize and Send an Auto Generated Document
- After you have selected and edited the content, click the View Draft Email or View Draft PDF button to review the customized document. It will open in a separate window.
- You can close this window, make any necessary changes, and review the draft again, as needed.
- To create the final version of the document, click the Send Final Email or View Final PDF button.
- For email messages, you will need to confirm that you want send the email and attach it to the permanent record. The system will send the email message to the recipients and a copy to your email account. The final email will display in a separate window. A confirmation message will display in the main window.
- For letters, the final version displays as a PDF in a separate window. You may print the PDF and mail it.
View the Attached Copy of the Auto Generated Document
- For Applications, the document copy is attached in the Documents Uploaded by OSP section of the Attachments & Routing questions page. Campus user can view these attachments.
- For Funding Actions and Admin Actions, the system adds the document copy to the attachments area of the item. You may need to expand the attachments section to see the list of documents. Campus user can view these attachments in the Related Documents section of the application’s Attachments page.
Note:
- If you create another auto-generated document of the same type, the system will add it as a separate attachment.
- You cannot delete an attachment, but you can update it, depending on the item’s status
SPAERC provides several ways for communicating with campus and sponsors:
- You can send auto-generated documents, which are partially-written emails and letters. You fill in the appropriate details and send the email or print out and send the letter. The system captures a copy of the document as an attachment on the item.
- You can send standard email messages as part of a process, such as returning an application you’re reviewing, or notifying campus about processed paper documents.
- The system automatically sends standard email messages based on the characteristics of an item.
Note: the same dialog displays for Approvals and Returns. For details on approving, see the Approve an Application article
Occasionally, you must return an application to the campus preparers so they can make corrections, provide more information, or mark the proposal “ready to submit.” When you return an application, it stops routing, and becomes editable so that the eGC1 owner or preparer can make the changes you request. The system add your return comments to an email notification to the PI, Administrative Contact, Pre-Award Budget Contact, and eGC1 Preparer.
Note: Do not return an application if the only change needed is to add an ad hoc reviewer to the Approval Flow. Preparers cannot add ad hoc reviewers when the eGC1’s status is Returned or Withdrawn. Instead, you could use the Auto-Generated Document “Application Review Notice” to request the change to the Approval Flow.
To return an application
- From the open Application, click Approve/Return in the left navigation menu.
- Under OSP Notes, enter any comments about why you are returning the application. You must enter comments when you return an application. The system includes them in the email notification to the research team.
- Scroll to the bottom of the window, and click Return to PI.
When you complete the return process:
- The application status changes from “In OSP” to “Returned”;
- The OSP node on the approval graph changes to pink and the application displays a pink “Returned” banner on its pages;
- The system sends an email notification to the application owners (PI, preparer, contacts) with your changes comments.
Tips
- To monitor activity on a returned application, adjust your Application tasklist to display applications with a status of “Returned.”
- E-mail Notifications: When you return an application, the system includes your comments in the email notification sent to the owners to alert them to the needed changes. Owners are the eGC1 preparer, PI, Administrative Contact, and Pre-Award Budget Contact.
- Owners may only add an ad hoc reviewer when an eGC1 is in routing or in OSP, so do not return an eGC1 if the only change needed is to add an ad hoc reviewer to the approval flow.
- Changes in Assignments
- When the preparer re-completes a returned or withdrawn application, the system re-evaluates the group/team assignment.
- The system does not change the assigned person so that the item returns to the person who last worked on it, and who can then reassign it if needed.